| Learn the ins and outs of our unified workspace for research design and panel management. |
This article applies to User Interviews
On this page:
Who is this article for?
🗣️ All researchers (both admins and users)
⭐ Recommended for all User Interviews plans
- The User Interviews workspace design (updated in March 2024!) is the simplest, most organized way to create and manage research projects. Read a quick summary of what's changed in our product release notes.
- ⭐️ New to User Interviews? Get up-and-running fast with our Quick Start Guide on the User Interviews Academy.
- This article provides an overview of features for general navigation, research design, and participant management, plus answers to frequently asked questions.
But first, here's a preview of the User Interviews experience, from project setup to execution.
General navigation
In this section, you'll learn how to take general actions within User Interviews, including creating projects, viewing your panel, managing settings, and getting support.
Create a new project
- When you log in, you'll find a list of all projects you have access to. Toggle between tabs to sort by project status, or use the filter button to sort by project type or permissions.
- To launch a new project, you can either:
- Click the + button to create a new project from scratch.
- Click Templates to create a project from one of your team's existing templates.

View your participant panel
- Click Participants in the left navigation bar.
- From there, toggle between your Hub panel (your own participants) or your Recruit panel (participants recruited from the User Interviews panel for past projects).

Access team templates
- Click Templates at the top right of your project page.
- Select from your team's saved templates to start a new project.
- If you don't see any templates and don't have permission to add one, ask your account admin to create one.
Manage team settings
- Click your name in the bottom of the left navigation bar, then click Team settings.
- From there, you can:
- Invite and manage team members
- Review or upgrade your plan
- Manage logos and email themes in the branding tab
- Edit templates for pages, emails, projects, and the application confirmation page
- Manage advanced options like your data consent notice, footer, authenticated domains, and sender profile

Manage account settings
- Click your name in the bottom of the left navigation bar, then click Account settings.
- From there, you can:
- Edit general account settings like your personal information and password
- Manage your availability by connecting your calendar and setting your working hours
- Add debit or credit cards for billing
- Set up integrations with tools like Zoom, Qualtrics, Sprig, and more

Get support
- Click Support in the bottom of the left navigation bar.
- You'll be directed to our Help Center where you can browse tutorials, product resources, and FAQs.
Research design
- When you create a new project, you'll enter all project details into the Research Design section. All features fall into four major areas:
- Recruitment
- Research activity
- Participant number and incentives
- Participant communications.
Recruitment
- Confirm your participant source. If it's incorrect, start a new project — this is not editable once set. If recruiting from your Hub panel, you can select participants from Research Hub or upload a CSV.
- Define participant criteria. Click Edit in the Participant Criteria box to choose key criteria for targeting.
- Set up your screener survey. Click Add in the screener survey box to create screener questions or reuse screeners from existing projects.
- Add a document for participant signatures. Upload your NDA, release form, or other document — participants will sign it before confirming a time slot.
-
Choose manual or automatic applicant review. Manually review applications as they come in, or automatically approve participants who match your criteria. If you have the Document Signing Add-On, double screening options are also available here.

Research activity
- For moderated studies, you can:
- Define session length in minutes
- Add session collaborators and manage their roles
- Set a static location or use an integration to generate links automatically
- Add available time slots and select manual or automatic scheduling (with configurable gap time)
- Set up scheduling rules (e.g., whether participants can reschedule)
- Add research activity requirements, including instructions and device requirements
- For unmoderated studies, you can:
- Define the task length in minutes
- Add a deadline for task completion
- Specify the task location via integration or a manual link
- Add preparation instructions and device requirements
Participant number and incentives
- Select the number of participants you want to recruit.
- Add the incentive amount. When researching with your own panel, you also have the option to provide no incentive.
- Choose whether incentives will be distributed by your team or by User Interviews. If distributing manually, select your incentive type from the dropdown.

Participant communications
- Add a project name and description for the recruitment listing shown to applicants.
- Send yourself test emails for the various notifications associated with your project.
- [For Hub only] Edit emails for project flow notifications.
- [For Hub only] Select your sender profile, email theme, and email template set.
-
Note: A reminder email goes out automatically 48 hours after the initial invitation to participants who haven't applied.
Participant management
Once your project is launched, switch to the Participant Management tab to handle all communication and scheduling. This section is divided into four areas: Invited, Applicants, Sessions, and Messages.
Invited (for Hub only)
- If you're inviting participants from your own panel, you'll see an Invited tab. This tab is hidden for those recruiting from UI's panel.
- From here you can:
- Invite more participants by selecting from Research Hub, uploading a CSV, or sharing a project link
- Track your project invitation email metrics
-
View or download a list of invited participants
Applicants
- View, search, and filter all participants who've applied to your project.
- Approve and invite qualified applicants.
- Update participant ratings.
- Bulk message participants.
- Export a CSV of participant data.
Sessions
- View confirmed sessions, including date, time, incentive, and participant name.
- Reschedule, complete, or remove sessions.
- Mark participants as "did not show" (learn how to replace no-shows here).
-
Edit the incentive for a specific participant.
Messages
- Email individual participants.
-
Bulk email participants, segmented by status and rating.
FAQ
Why can't I change the project type?
Once you've selected a project type (via a template or manually), it can't be changed in the Research Design section. To change it, go back to the main page and start a new project. More flexibility for projects and templates is planned for the future.
Why can't I launch a project?
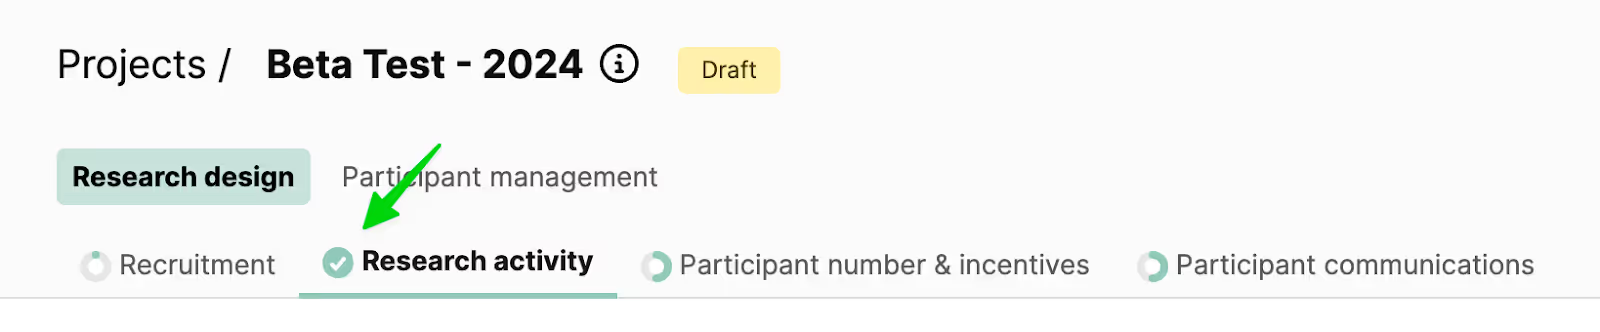
- Double-check that all required information is filled out. If the green circles next to the tabs under Research Design aren't fully filled in with a check mark, something is missing.
- If all circles are filled and you're still stuck, contact your PC or CSM directly for help.
I still have questions. Who do I talk to?
- Email projects@userinterviews.com or use our in-app live chat to get support.
- ⭐️ Have feedback? Opt into UI’s customer feedback panel! As you’re getting to know User Interviews, we’d love to hear your feedback on what’s working, what could be improved, and what you’d like to see on our product roadmap. Fill out this form to join our feedback panel and shape the future of research recruitment